Food

Egg and Sausage Breakfast Casserole

Egg and Sausage Breakfast Casserole Recipe at: stephanie-spring.comEgg and Sausage Breakfast Casserole Recipe at: stephanie-spring.com Egg and Sausage Breakfast Casserole Recipe at: stephanie-spring.comBrunch on Christmas morning was our thing with Eric’s side of the family, but this year we brunched with my side. Either way, it’s a win-win. Brunch, family, and Christmastime!

The best part about this recipe is the simplicity of it all. While packing for three Christmas’ after our churches Christmas Eve service, and wanting to snuggle on the couch, the last thing I wanted to do was spend the entire night in the kitchen. I wanted to savor the moments and enjoy them while they lasted. I laid out the crescent roll, browned the sausage, covered them, and placed it in the refrigerator. The next morning other, than squealing about all things Christmas, I whisked the eggs mixture and placed it in the oven. Creating the memories surrounding Christmas was exactly what I was able to, thanks to this yummy and simple creation. 🙂
Egg and Sausage Breakfast Casserole Recipe at: stephanie-spring.com


Ingredients:

  • One can Crescent rolls
  • One pound of ground sausage
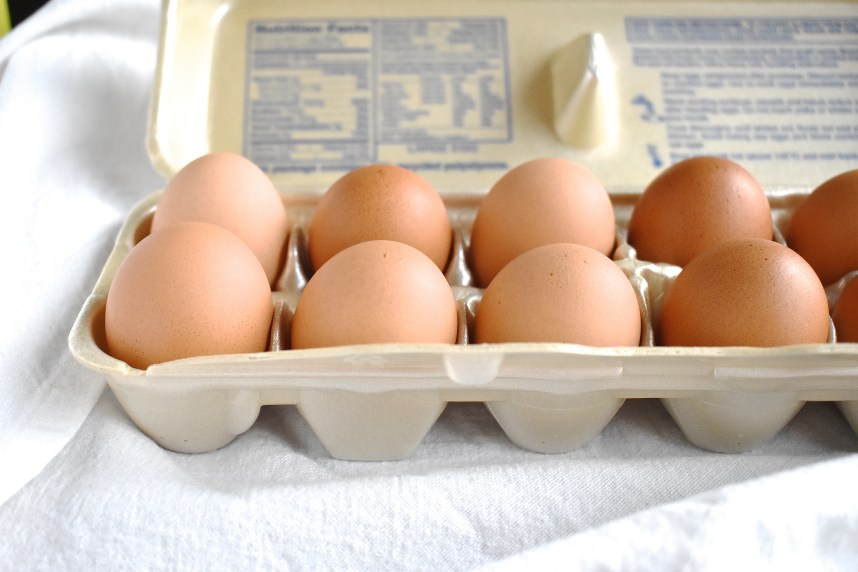
  • 6 eggs
  • 1/2 cup milk
  • salt and pepper to taste
  • 1.5 cups of shredded cheddar cheese


What to do:

Preheat oven to 350 degrees F. Grease a 9×13 pan with butter. Line the pan with the crescent rolls. (If you unravel them the way they come out of the can, you are set!) In a large pan, brown the sausage. Drain the grease and layer on top of the crescent rolls. In a medium-sized bowl, whisk the eggs, milk, salt, and pepper. Pour overtop the sausage. Sprinkle with cheese. Bake in the oven for 30 minutes.


Show and Tell + Must-Have Christmas Recipes

There are three must-have recipes that stick out to me each Christmas and I hope you find them on your table this holiday season!
Spinach Dip and Soda Bread-- Recipe at: Stephanie-spring.comEvery year at Christmas, I serve this and it disappears quickly. 😉  It’s a crowd-pleaser and easy! Peppermint Bark--Recipe at: Stephanie-spring.com
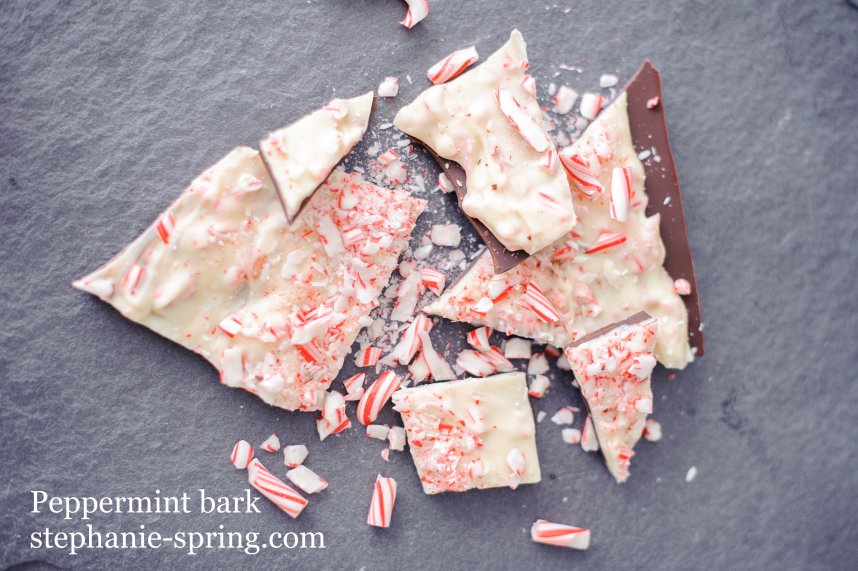
I have mentioned this several times but it bares repeating. Peppermint bark is my love language. It’s a great gift, appetizer, dessert, or whatever your heart desires! My friend actually text me this week and told me she made more for a party because it was so easy. 🙂Homemade Hot Chocolate--Recipe at: Stephanie-spring.comMy hot chocolate recipe is something that is near and dear to my heart. 🙂 We grew up drinking this hot chocolate and it easily brings back a flood of memories. Tip: Add peppermint mocha creamer for some peppermint hot chocolate flavor or peppermint essential oil.

Happy Tuesday! I hope your holiday week leading up to Christmas is extra special. xo

Double Chocolate Peppermint Cookies + Winner!

The holidays are surrounded by food and the memories being made while creating it. If you have not done so yet, add cookie baking to your list before the 25th rolls around! Put on some Christmas tunes, sip some hot coffee, and whip up this batch of cookies. The chocolate infused with peppermint is the perfect balance of lightening up the richness of the double chocolate. Not that double chocolate anything is ever a bad thing. 😉


Ingredients:

  • 3/4 cup Stonyfield plain greek yogurt
  • 1/2 cup butter (melted)
  • 2 eggs
  • 1 cup granulated sugar
  • 10 drops peppermint essential oil (or more)
  • 2 cups all purpose flour
  • 1 and 1/3 cups 100% cocoa powder
  • 2 tsp vanilla extract
  • 1/2 tsp baking soda
  • 1/4 tsp salt
  • 1 and 1/3 cup dark chocolate chips


What to do:

Preheat oven to 350 degrees. Combine all wet ingredients and mix. Fold in the dry ingredients and then lightly mix. I used my Levoons measuring spoons for all my dry ingredients to make measuring so much easier. It scraps off all the excess while measuring and I loved it! Form the dough into one inch balls and lightly flatten. I like to use this scoop. It works like a charm!  After my batter was prepped and the oven was heated, I scooped my goodies onto my Silapt mat. This was the first time I used it and absolutely loved it! The mat can be put right on a baking sheet and put in the oven. I didn’t have the grease the baking sheet at all and the clean up was ten times easier! Bake for about 12 minutes. Pull out of oven and let cool for about 10 minutes.


Each day this week I will be announcing the winners from last week’s giveaway week! You can see if you won the blanket scarf from last week’s start of the giveaway week, here! Thank you to everyone who entered and to Blooms and Linen for the beautiful scarf! Also, there’s still time to enter the other giveaways below!

Day Two: Pillow Cover giveaway

Day Three: Lily & Val giveaway

Day Four: Signed copy of Present Over Perfect

Day Five: JND $50 Gift Card

*As a Stonyfield blogger ambassador, I am being compensated for this post. However, the thoughts and opinions are 100% my own. Thank you!*

Spread Love, Joy, and Peace

dsc_0177dsc_0178dsc_0166
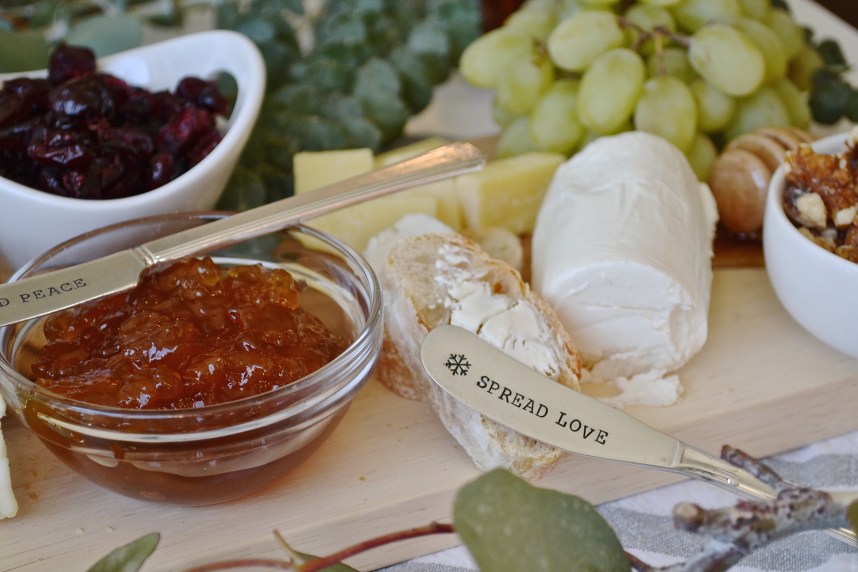
The holidays encompass so many things in my mind. I cherish the extra time with family that falls through the cracks throughout the year. I love seeing friends from near and far, coming together under one roof for one party or another. I crave the food that is hearty and rich and should only be enjoyed among the ones you love. It’s the epitome of holidays to me.

To kick off the season in eatable fashion, a cheese board is the staple of it all. The conversation starter. A piece of art. A mix of flavors that pairs the best with wine. From Thanksgiving to Christmas my heart bursts at the seams with all that’s in store. Cheese boards are the beginning of memories to be made. Here’s to the combinations on one small board that will have your heart singing from Thanksgiving to Christmas and beyond!


Pictured//The Spread:

Cheeses: Brie// Scottish Sharp Chedder// Honey Infused Goat Cheese

Nuts: Almonds// Walnuts

Fruit: Granny Smith Apple// Ginger Peach Jam// Craisins// Green Grapes

Sourdough Baguette

Local Honey

Cabernet sauvignon


Buy:

Cheese boards: Walnut Board/ Slate/ Light Plank

Spreaders: Jessica N Designs Spreaders: Use discount code: JNDHoliday15 for 15% off all orders placed from Friday November 18 – Sunday November 20. 

Wine Glasses: Red Wine Glasses

Linen Towel: Red Stripe/ Blue Tassel

White Ramekins: Round One/ Round Two/ Round Three

Clear Prep Bowls: Big and Small


Frozen Yogurt with Dark Chocolate PB Cups

Frozen Yogurt with Dark Chocolate PB CupsFrozen Yogurt with Dark Chocolate PB CupsFrozen Yogurt with Dark Chocolate PB CupsFrozen Yogurt with Dark Chocolate PB Cups Frozen Yogurt with Dark Chocolate PB Cups Frozen Yogurt with Dark Chocolate PB Cups Frozen Yogurt with Dark Chocolate PB CupsNo matter the time of year, it’s become one of our favorite sweet tooth cravings in our household. Which one you ask? The frozen yogurt or the dark chocolate peanut butter cups? Actually, both! The best idea was to put the two together to create a bowl of goodness.

Our ice cream maker was an unexpected gift for our wedding and boy did we welcome it with open arms! It is easy to use and clean up!

Even if it is chilly outside, your family will love this and keep coming back from more. Plus, you don’t need to tell them it’s made with yogurt and candy without junk and less sugar than normal. 😉 Secrets safe! xo


Ingredients:

  • 1.5 cups whole milk
  • 1/4 cup granulated sugar
  • 4 cups Stonyfield Vanilla Greek Yogurt
  • 1/4 cup heavy cream
  • 6 UnReal dark chocolate peanut butter cups (cut into bite-sized pieces)


What to do:

Combine all ingredients, except peanut butter cups, into a stand or hand-held mixer. Mix until sugar is dissolved. Pout into ice cream maker and churn for about 20 minutes. Churn another five minutes. Then, slowly add the bite-sized peanut butter cups. Pour ice cream into a freezer safe container with a lid. Place in the freezer for at least two hours. Scoop and enjoy!


*As a Stonyfield blogger ambassador, I am being compensated for this post. However, the thoughts and opinions are 100% my own. Thank you!*